
Installing FLProg: downloading, first launch, and checking functionality
This guide will help you correctly install FLProg and ensure that the environment is fully ready for use.
We will not touch on complex settings or analyze all the features of the program. Our task is simpler and more specific: to download the current distribution, install it, check the drivers, and create the first test project.
FLProg is a desktop environment for visual programming of microcontrollers. Instead of writing code, the user assembles the device logic from ready-made functional blocks and connections between them. However, before moving on to creating schemes, it is necessary to prepare the workspace.
1. Check the computer before installation
For stable operation, it is recommended to use Windows 10 or 11. The program can also run on older versions, but modern OS eliminates most issues with drivers, access rights, and system updates.
Before starting the installation, make sure that:
- There is free space on the system disk. It is recommended to allocate at least 10 GB.
- The amount of RAM is sufficient. Ideally, you should have 8 GB of RAM or more.
- There is a connection to internetis. It is necessary for downloading the program and, if necessary, drivers.
Advice
Prepare a USB cable and a microcontroller board in advance. In the examples, we use Blue Pill (STM32), but the type of board does not matter for the installation process.
2. Check the bitness of Windows
Before downloading the distribution, it is necessary to determine the bitness of your operating system.
How to do it:
- Open the Start menu and go to Settings (gear icon).
- Select the section System, then click About System.
- In the characteristics block, find the line System Type.
- If it states “64-bit operating system”, download the 64-bit version of FLProg.
- If “32-bit”, a corresponding 32-bit build will be required (if available on the site).
Information
The bitness of Windows relates exclusively to your computer. It does not affect the choice of microcontroller within the environment — you will specify the board architecture after starting the program.
3. Download FLProg from the official website and choose the delivery option
You should only download the program from the official developer's website.
- Open your browser and go to the address: https://flprog.ru
- Go to the downloads section.Navigation usually looks like this: Downloads → FLProg Distributions → Current Version → FLProg Program.
Two main formats are available on the download page:
- Installer — classic .exe file. The installation wizard will automatically copy the files, create shortcuts, and integrate the program into the system. This option is optimal for permanent use.
- Portable version — an archive that only needs to be unpacked into any folder. The program runs directly from it without installation in the system.
Which option should a beginner choose?
We recommend using the installer. It eliminates the need to manually search for the executable file, create shortcuts, or configure paths. The program is installed in the usual way and is always available through the Start menu.
The portable version will be useful for advanced users: for example, for testing new builds without risking the main environment, for transferring the program on a flash drive, or for working simultaneously with different versions of FLProg.
File name and saving:
The installer name usually indicates the version number and architecture, for example: SetupFLProg_9.7.1_Win64.exe (the numbers may vary as the program is regularly updated).
Save the file not in the common "Downloads" folder, but in a separate directory, for example: C:\Install\FLProg. In the future, this will simplify the search for the installer if a reinstallation or rollback to a specific version is required.
4. Run the installer
Find the downloaded FLProg installation file. It is usually located in the folder where you saved the distribution. For example:
SetupFLProg_9.7.1_Win64.exe
The version number in the file name may be different.
Warning
When you first run the Windows installer file, it may issue a warning. This is a standard situation for applications that do not have a mass digital signature in the Microsoft database.
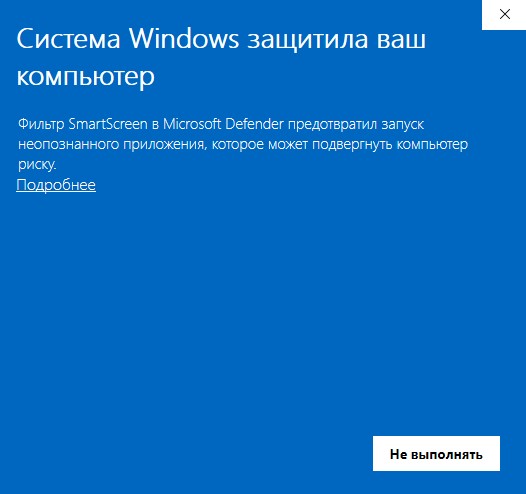
- A blue screen will appear with the message: «The Windows system has protected your computer». Click on the link «More details» (fig. 1).
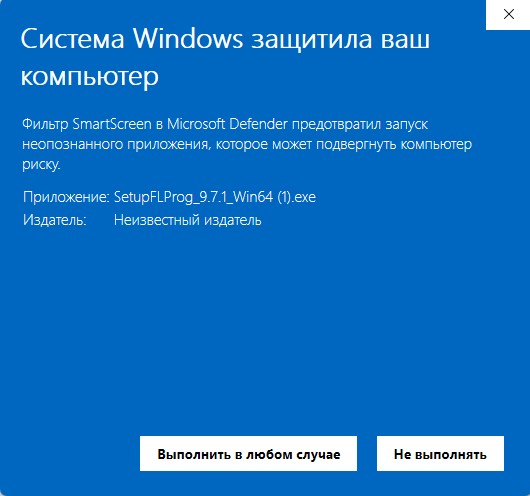
- An additional menu will open. Click the button “Execute anyway” (fig. 2).
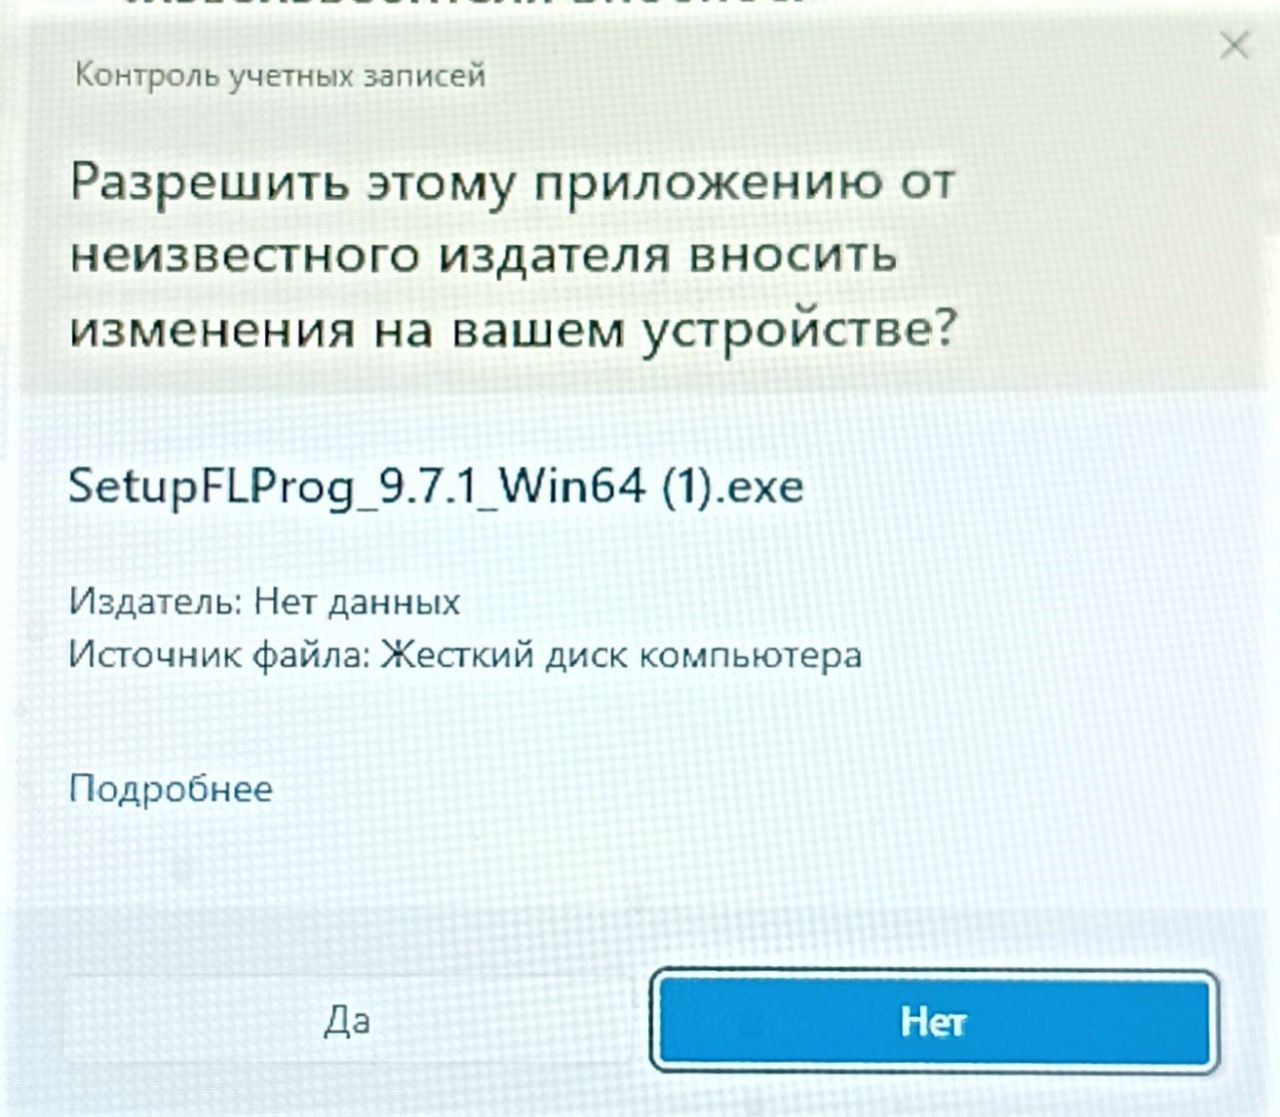
- A window will appear “User Account Control” with the question: “Allow this app to make changes to your device?”. Click “Yes” (fig. 3).
Further steps of the installation wizard:
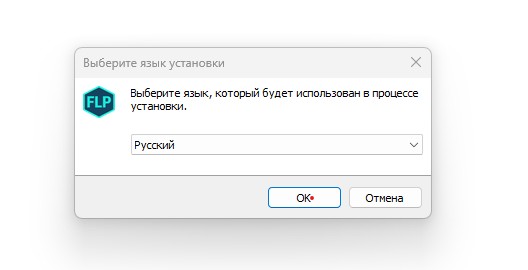
- Language selection: In the first window, select the interface language (default is set to "Russian") and click OK (fig. 4).
- License Agreement: Please read the text, accept the terms, and click “Next”.
- Additional Tasks: The installer will suggest a list of actions (for example, creating a shortcut on the desktop). Select the necessary items and click «Next».
- Installation start: Click the button «Install».
During the installation process, the program will copy files, create shortcuts, register file types, and install necessary drivers.
Note: the installation may take a few minutes. If the indicator "hangs" for a short time, do not close the window — most often at this moment drivers are being installed in the background, which takes time.
Completion:
When the process is about to finish, a final window will appear.Make sure the checkbox is checked next to the item “Run FLProg”, and click “Finish”.
The program will open, and you will see the startup window of the environment. The installation was successful! However, the next step is to perform an initial check of the environment and drivers.
5. Checking and Installing Drivers
The program is installed, but for FLProg to be able to "communicate" with the microcontroller, the computer must recognize it. This is handled by drivers.
If you are using official boards (for example,Arduino Uno), drivers are often automatically pulled through the Windows Update Center.But if you are working with boards based on CH340 chips (a common case for Arduino Nano, Blue Pill) or CP2102 (ESP8266/ESP32), the driver needs to be installed manually.
How to check if the computer sees the board:
- Connect the board to the computer via USB cable.
- Press the key combination Win + X and select Device Managerspan>.
- Expand the branch Ports (COM and LPT).
If everything is fine, you will see a device with a recognizable name, for example:
- USB-SERIAL CH340 (COM3)
- Silicon Labs CP210x USB to UART Bridge (COM5)
Remember the COM port number (the number in parentheses). You will need it later when uploading the firmware to the board.
Warning
If an 'Unknown device' with a yellow exclamation mark appears in Device Manager, it means the driver is not installed.
Download the driver for your chip (CH340 or CP2102) from the manufacturer's website, extract the archive, and run the installer (INSTALL file or .exe). After installation, disconnect and reconnect the board.
Tip: If the port still does not appear, try a different USB cable. Many cables sold with cheap electronics are intended only for charging and do not have data transmission lines.
Download the driver for your chip (CH340 or CP2102) from the manufacturer's website, extract the archive, and run the installer (INSTALL file or .exe). After installation, disconnect and reconnect the board.
Tip: If the port still does not appear, try a different USB cable. Many cables sold with cheap electronics are intended only for charging and do not have data transmission lines.
6. Preparing the workspace and naming conventions
One of the common mistakes beginners make is saving projects directly in the program's installation folder. When updating FLProg or reinstalling Windows, you risk losing all your work.
Create a separate place for projects:
Prepare a folder in advance on your working or system drive. For example: D:\FLProg_Projects or Documents\FLProg.
It makes sense to create a basic structure inside it:
- Educational Projects — for examples and tests.
- Working Projects — for real tasks.
- Backups — for backups.
How to properly name projects:
Names like test, new project or trial in a week will not tell you anything. Get into the habit of giving files meaningful names.
A good naming formula: Task_Controller_Version
- LED_Blink_BluePill_v01
- Timer_Light_Off_Arduino_v02
- Modbus_HMI_Test_v01
Advice
Use Latin letters and underscore characters.
Although FLProg works correctly with Cyrillic, some third-party compilers and libraries may produce errors if there are Russian letters or spaces in the file path or its name.
Although FLProg works correctly with Cyrillic, some third-party compilers and libraries may produce errors if there are Russian letters or spaces in the file path or its name.
7. First Test Project: Checking Compilation
Before moving on to complex schemes, you need to ensure that the environment works correctly and can compile the code. We will not upload the firmware to the board (if it is not at hand yet), but will simply check the internal "kitchen" of FLProg.
Step 1.Creating a project
- In the main menu of FLProg, select File (or click on the icon
 )→ New project for controller.
 - In the opened window, click the button with three dots next to the "Controller" field.
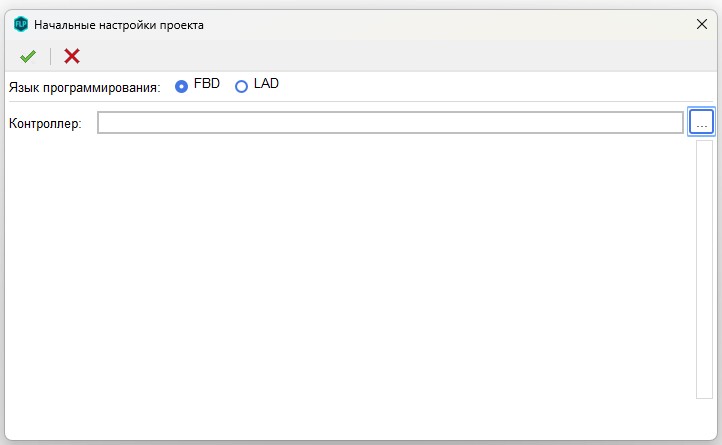
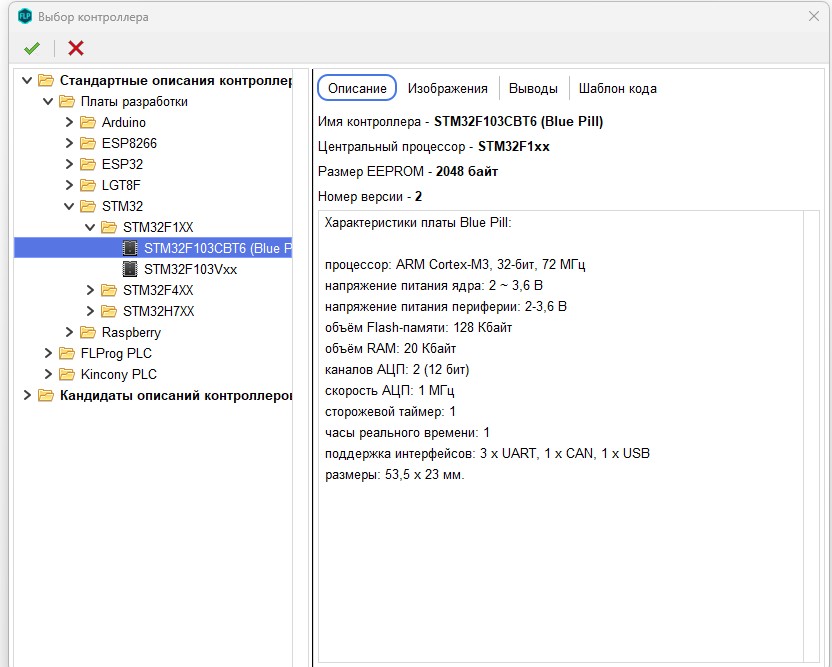
- Open the folder Standard Controller Descriptions → Development Boards → folder STM32
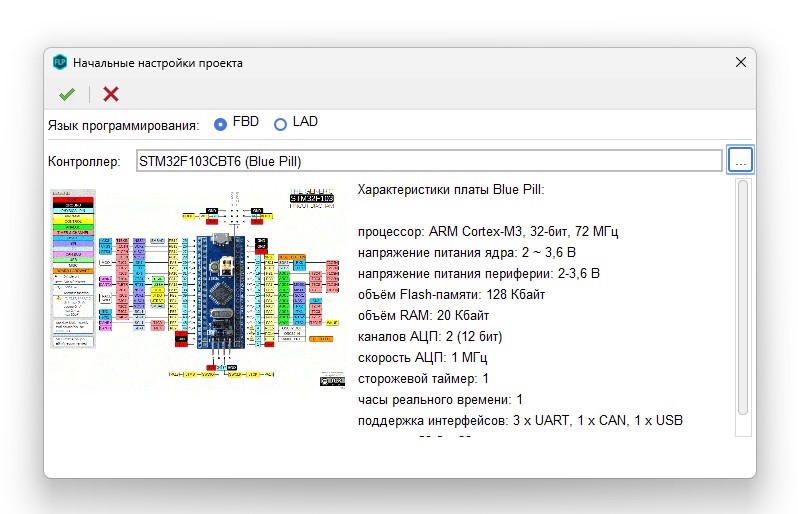
Leave the programming language as default (FBD) and confirm the creation.
Step 2. Assembling a Simple Circuit
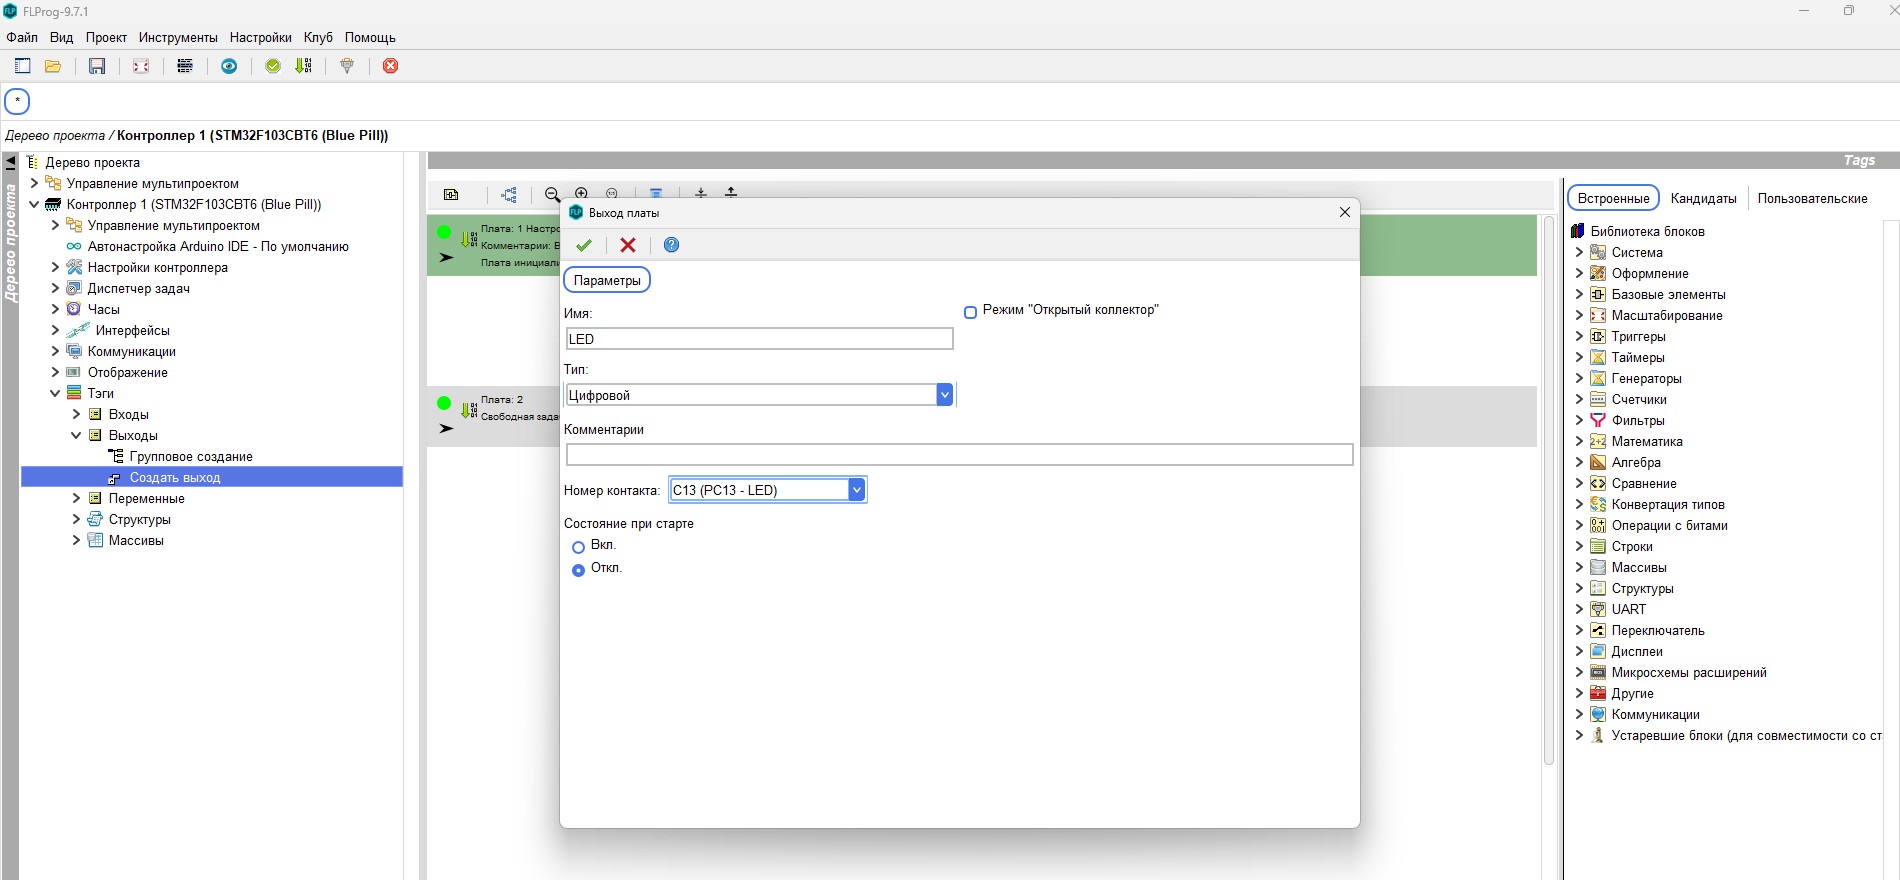
- In the project tree on the left, expand the branch Controller → Tags → Outputs.
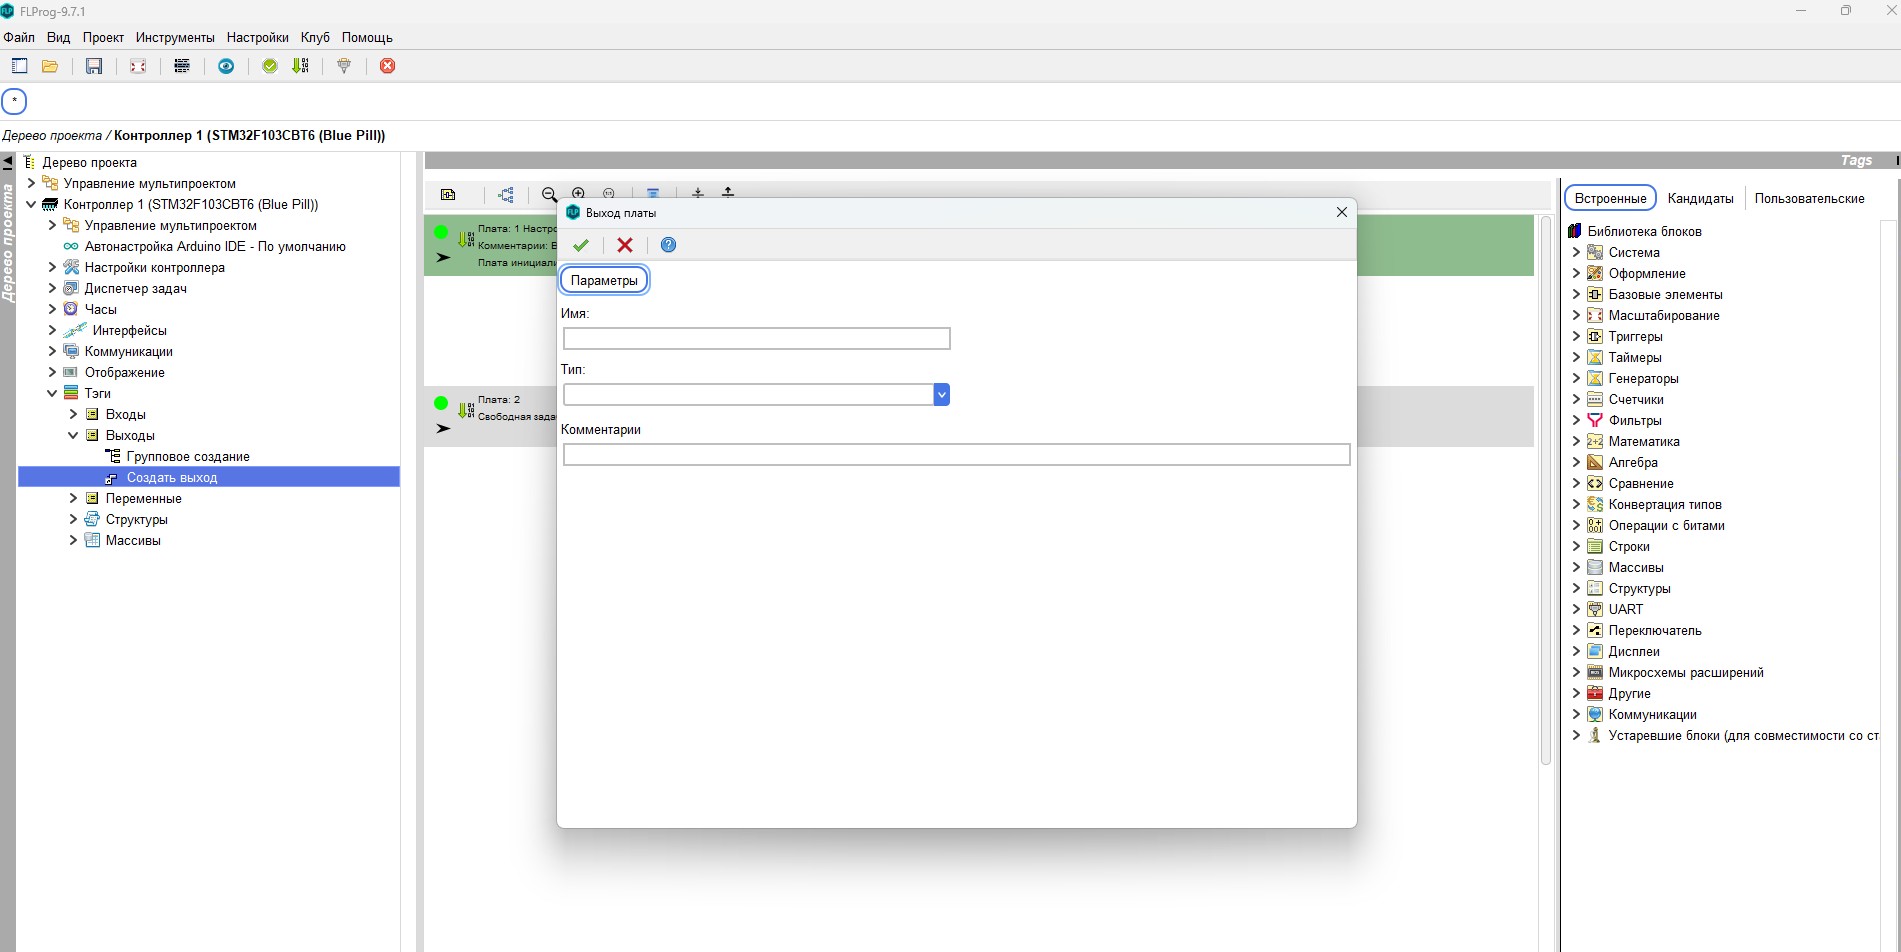
- Right-click on the "Outputs" branch and select Create Output.
- Set a name (for example, LED), select the type Digital and specify the pin number (for Arduino Uno this is usually 13, for Blue Pill — C13). Click confirmation (green checkmark).
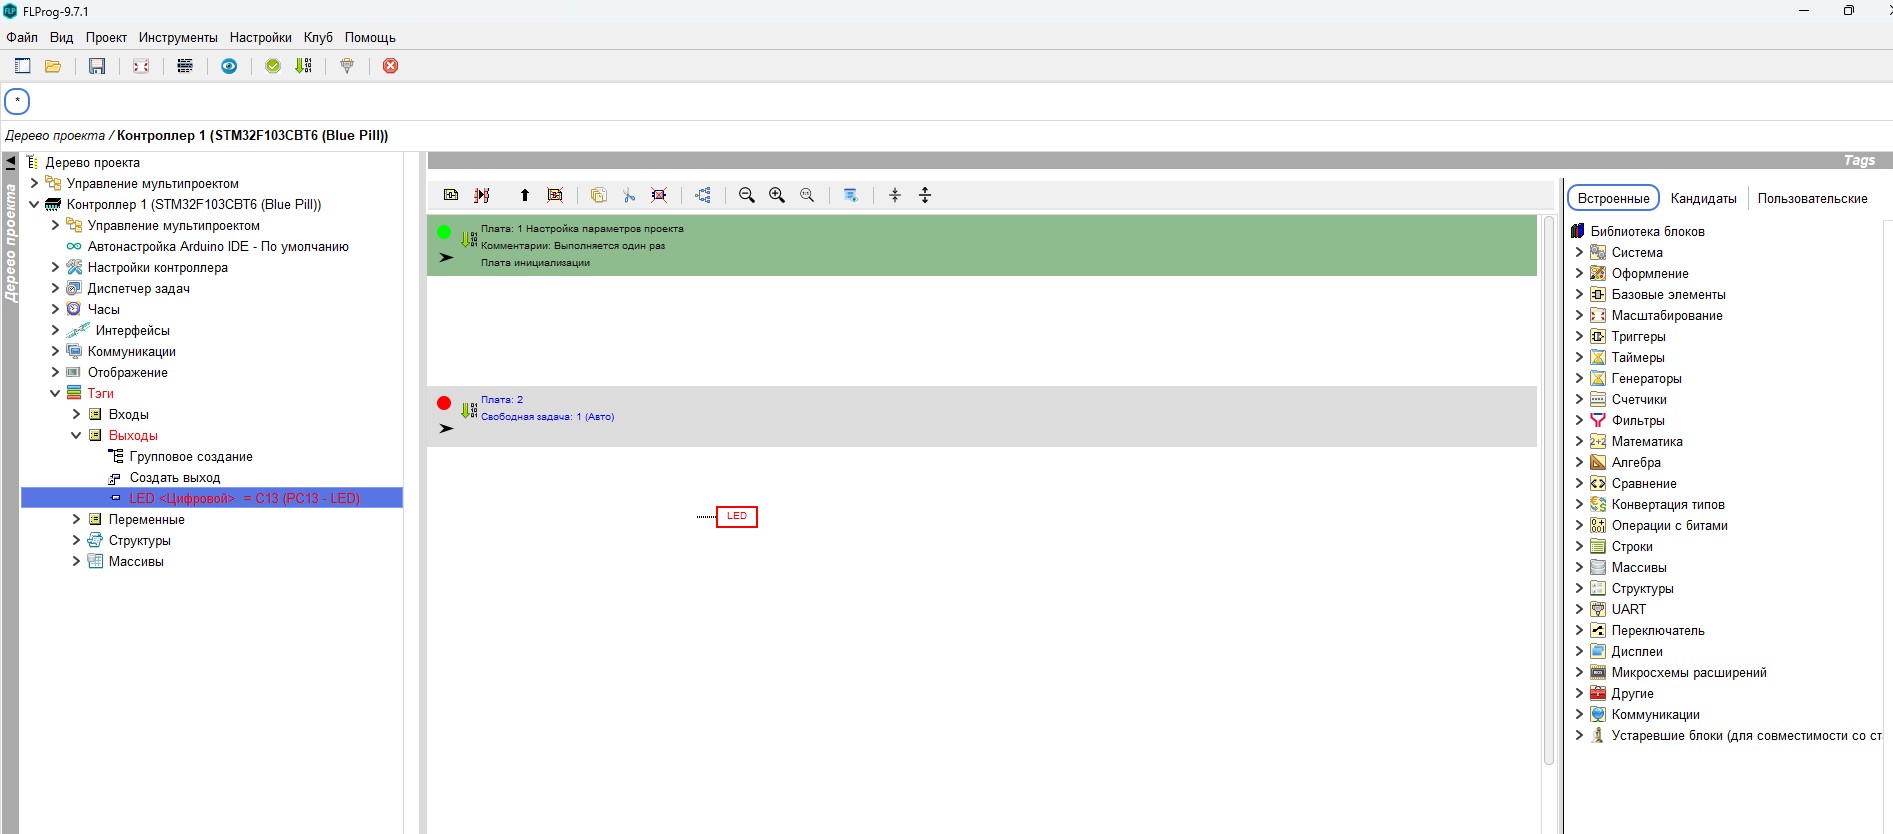
- Drag the appeared tag LED from the project tree directly onto the workspace.
- Note: the block input is colored red. This means that it is not connected, and such a scheme cannot be compiled.
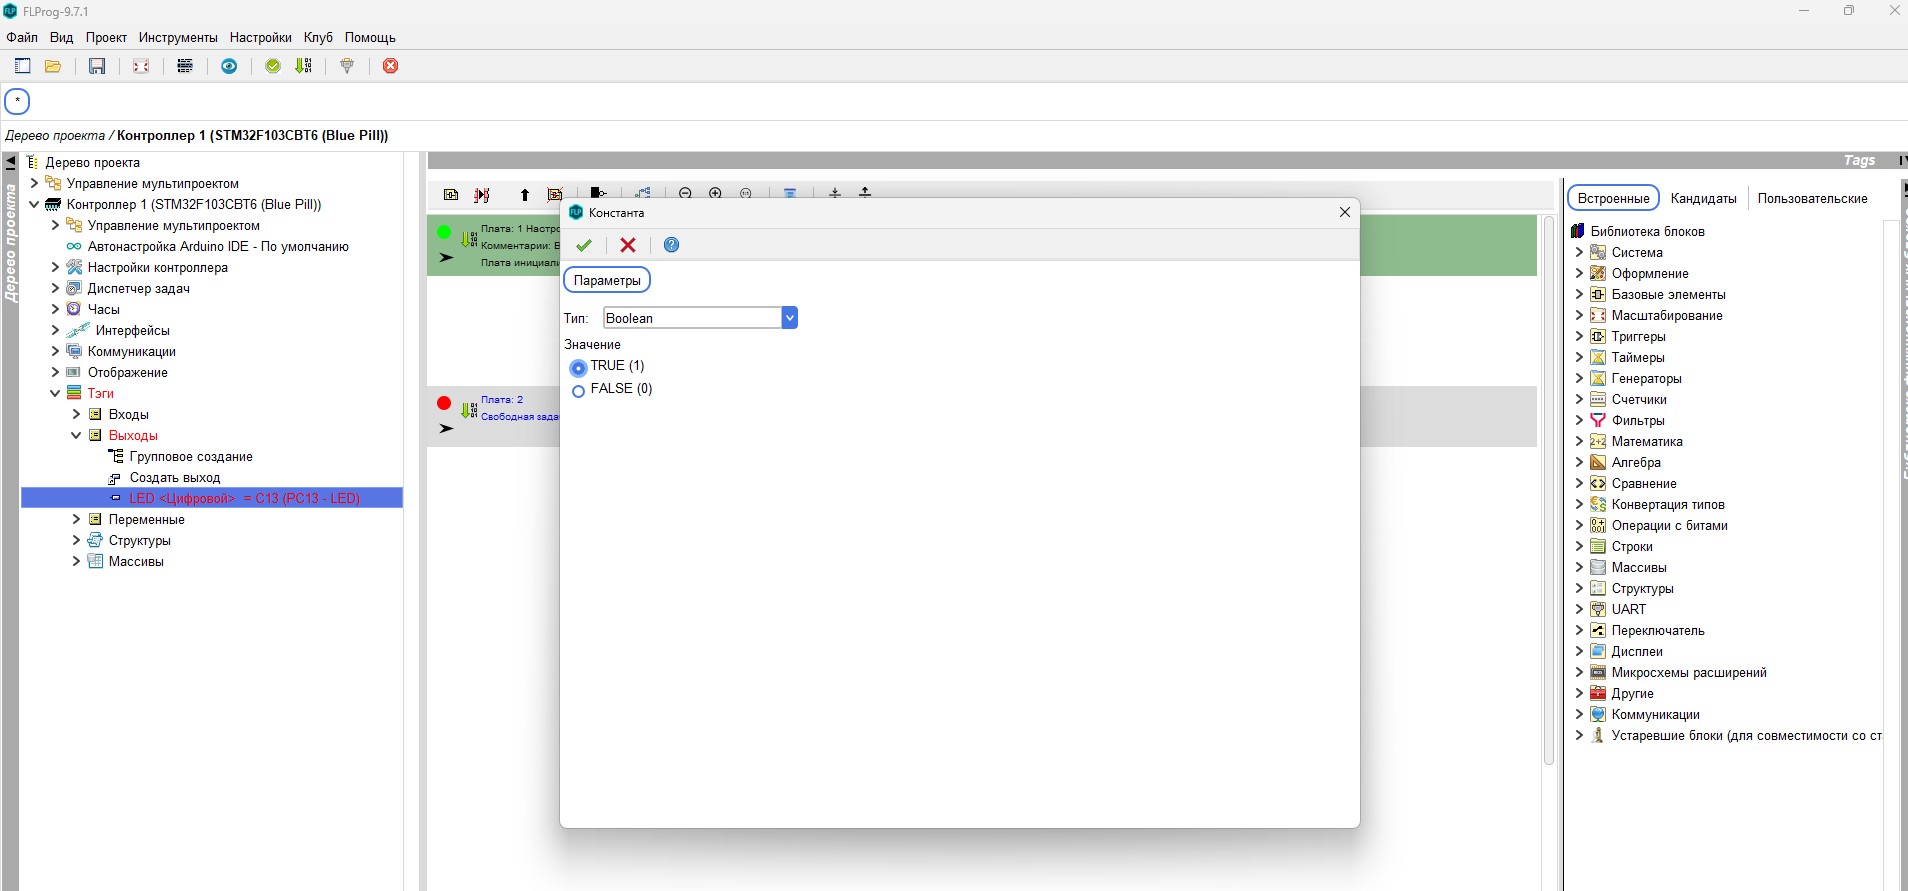
- Right-click on the block input and select Insert Constant.
- In the window that appears, select the value True (1) and click the green checkmark (confirmation)
Step 3. Compilation
- In the top menu, click the button Compile Project (or select the corresponding item from the menu).
- The built-in Arduino IDE window will open, and the code compilation process will begin.
- Wait for the white text to appear: “Sketch uses...” indicating the memory used.
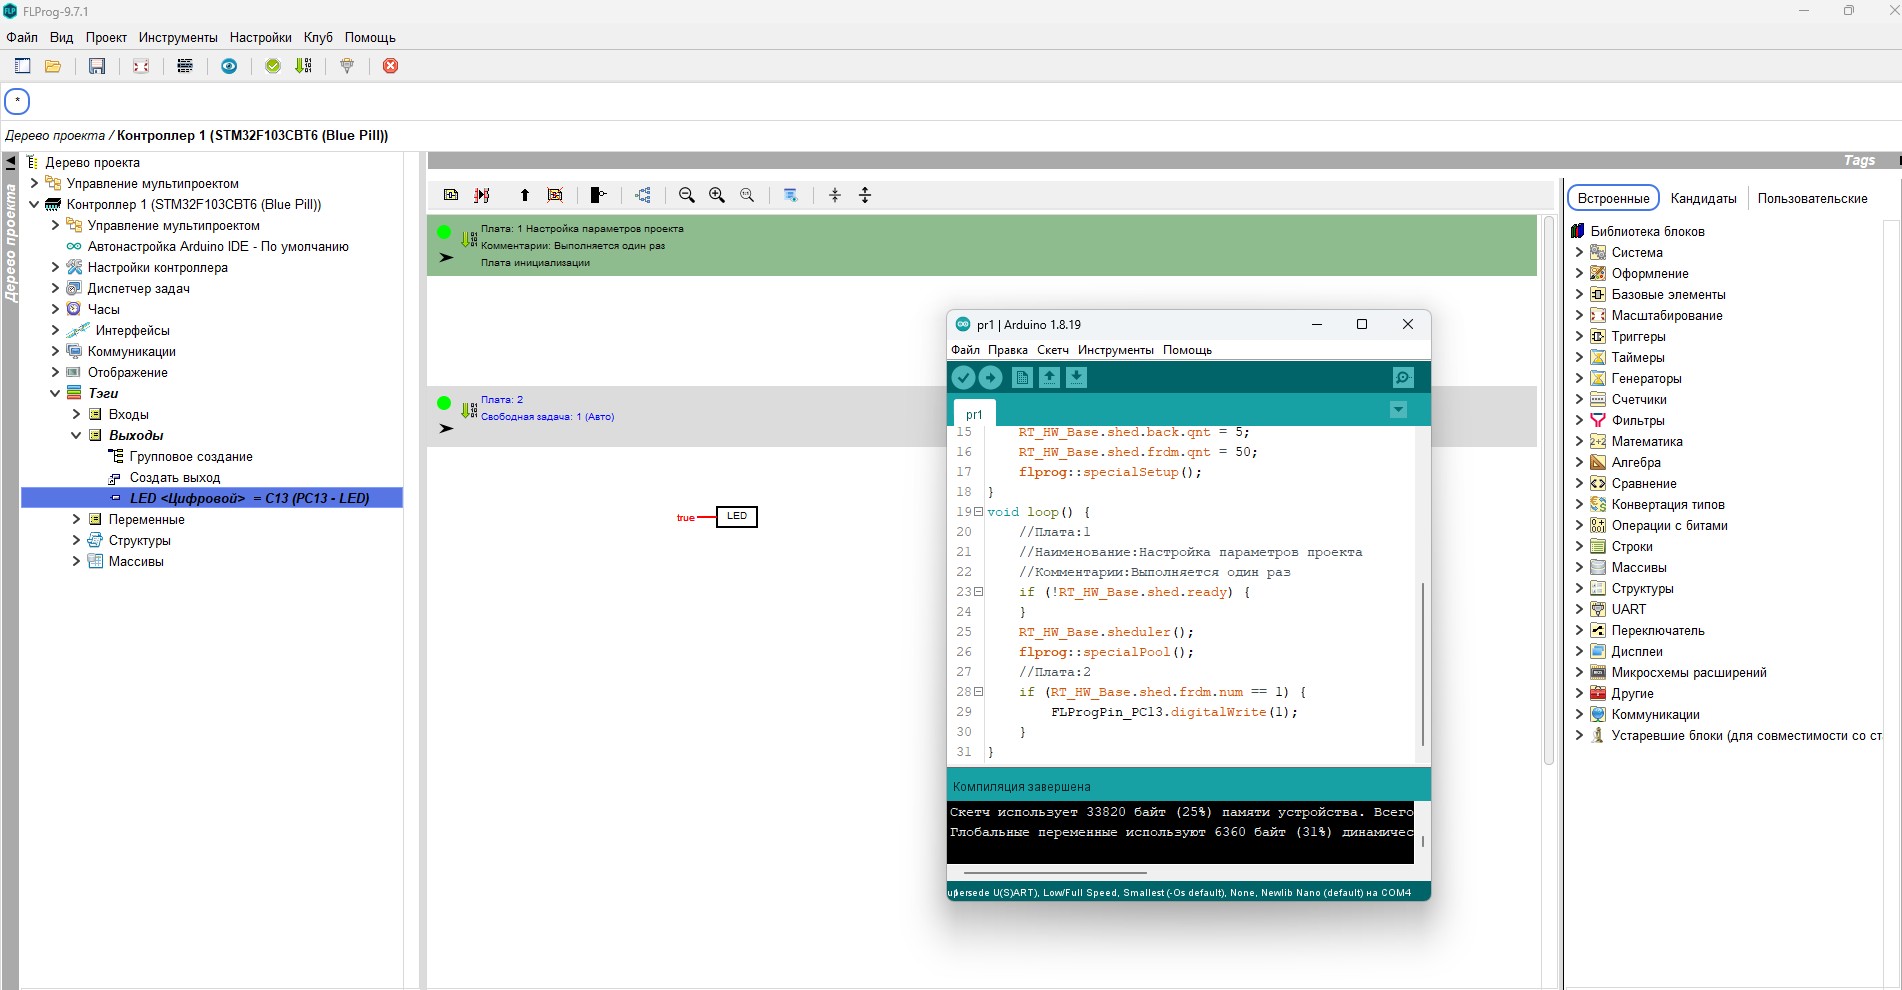
✅ If you see this message without red error lines — congratulations. The environment is set up perfectly, the compiler is working, and we can move on to real tasks.
Final readiness checklist
Before moving on to studying blocks, quickly run through this list. If all the items are completed, you are fully ready to work.
| Step | What we check | Expected result |
|---|---|---|
| 1 | Launching FLProg | The main window opens without errors |
| 2 | Drivers | The board is recognized in Device Manager, COM port is visible |
| 3 | Project folder | A separate folder is created, not inside the program directory |
| 4 | Creating a project | The new project window opens, the board is selected |
| 5 | Compilation | The test project compiles successfully, no errors |
| 6 | Saving | The project is saved in your working folder under a meaningful name |
If all the checkmarks are in place — the environment is fully ready to work. But there is one more important step to take right now, while everything is fresh in memory.
Registration in the FLProg club
The program is installed, the drivers are working, the first project is compiled.You could immediately start studying the blocks, but we recommend doing one thing that will greatly simplify further learning.
Register in the FLProg club.
This is not a formality. Registration provides access to comprehensive learning materials, additional libraries, project examples, and a user community. Many questions you will encounter in the first chapters have already been discussed in the club — and ready answers will save you hours of work.
Warning
Registration in the FLProg club is only possible through the program itself.
You can log in on the club's website, but you can only create an account from FLProg.
For this, an internet connection will be required.
You can log in on the club's website, but you can only create an account from FLProg.
For this, an internet connection will be required.
How to register
- In the main menu of the program, select the item Club Register.
- In the opened window, fill in the fields:
- Login — come up with a unique name (in Latin).
- Password — a secure password that you will remember.
- Repeat Password — enter the password again for verification.
- Click the registration button.
If the login is already taken: the system will issue an appropriate message. In this case, just come up with another option — add numbers or change the spelling.
What happens after registration
If everything went successfully, you will see your login in the status bar of the program (at the bottom of the main FLProg window). This means that the authorization has been completed.
Re-login will not be required. The program will remember your data on this computer, and the authorization will be saved automatically. You can log out manually through the same "Club" menu — then you will need to enter your login and password again at the next launch.
Unified account for the program and the website
The login and password you created in the program also work on the club's website: https://flprog.club/
This means that you can:
- Log in to the site and view your projects, discussions, and materials.
- Download additional libraries and examples.
- Participate in the forum and ask questions to developers and other users.
Advice
Write your login and password in a secure place (password manager or notebook).
If you forget your data, recovering access may be more difficult than simply saving it right after registration.
If you forget your data, recovering access may be more difficult than simply saving it right after registration.
Now that the environment is fully set up, the drivers are working, and the club account is created, we can move on to the most interesting part — studying blocks and creating our first real projects. All of this is available in the club's personal account.